Foam Rolling: Just Do It
So you have been working out hard, hitting the gym consistently for months.
On top of that, you have been cleaner than a bodybuilder with the resolve of a T Pool Team Name
ibetan monk. Good for you, but there is something else you are probably forgetting: stretching/mobility work. It’s
not sexy, its not fun, it won’t keep you in shape or make you dramatically st
ronger, but it can do something just as important. Preventing injury ensures that you can keep up your consistent workouts, and the stronger and fitter you get, the more you will need to
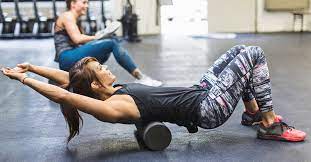
actively work to prevent injury. Good old fashioned stretching will be one of your most important methods for increasing mobility, but there is another tool that every lifter should have in their arsenal: a good foam roller. Read on to learn more about foam rollers and how they can help you feel and move better, assisting in both injury treatment and prevention.
The secret behind the foam roller is a concept known as myofascial release. Muscle is covered in connective tissue, known as fascia, and over time with training this connective tissue can form dysfunctional adhesions, leading to scar tissue formation and muscle tightness. While stretching addresses tightness, myofascial release with a foam roller triggers a reflexive response to relax the muscle, and it also can help breakdown adhesions in the connective tissue. This will improve mobility and tension, leading to greater performance with less pain.
The Tools:
There are two primary options you can use to achieve self myofascial release. The first is to use a foam roller, and the second is some type of ball, usually a tennis ball or lacrosse ball. Foam rollers come in different sizes, and honestly a big or small roller will probably suit your needs. Personally, I own this roller in the 6×36 size, which is one of the full size ones, but you could probably get away with the smaller version.
The Method:
With foam rolling, there are basically two different schools of thought. The first is that the spot in question should be rolled at a moderate place for maybe 20-30 passes. The second method is to slowly roll over the muscle until you find a “spot.” These spots are trigger points, and if you keep the roller at this spot and hold your body position for 20-30 seconds, eventually the tightness and pain will subside and the muscle should dramatically loosen. Then you simply keep moving along the muscle, working out all of these tight spots.
Places to Roll:
IT Band
Just a fair warning: this one is going to hurt. To execute this maneuver, you will want to get on the roller on your side with the bottom leg straight and the top leg crossed over it for stability. Place the roller along the side of your leg, and proceed move your body in such a way that the roller moves from below your hip to just above the knee.
Quads
For this one, lie on the roller face down. Position it so that it is just above your knees on your thighs. Proceed to move your body in order to roll all the way up your thigh as far as you comfortably can.Glutes
I think this is one of the very best places to roll, and doing this has really helped me with hip and lower back pain. Sit on the roller with your butt balanced on the surface. Cross one leg over the other and place your foot on the knee of the straight leg. Then simply move around to get the roller on different places on the glutes. Really try to mix it up and work different angles with this one, there are lots of places that can be tight in there.Calves
The calves also can get pretty tight, and rolling these muscles has helped me personally with doing seated calf raises without pain. For this, I prefer to sit on my butt with my legs straight and crossed with one leg on the roller. Then roll from just below the knee down to the start of the foot as comfortable.
Thoracic Mobilizations/Extensions
This exercise is a not your typical rolling movement, but nonetheless doing these can help with your posture by correcting excessive kyphosis (think hunchback). To do these, position the roller on your upper back just below your shoulder blades. Glue your butt to the ground and tense the abs to make sure there is no movement at the lower back. Put your hands behind your head and pull your elbows back. Keeping your chin tucked, pop out your chest and push your head towards the ground. After doing this, the spot should loosen up, and you can then move the roller farther up the back and repeat.
Conclusions
Performing these select mobility exercises on the foam roller regularly will really go a long way for most people in feeling and moving better at the gym. Personally, I think that foam rolling is done best before working out, while stretching should DEFINITELY be saved until after. Both are important, however, in maintaining good flexibility and looseness that ensures long-term health in the lifting game. I would recommend incorporating some foam rolling into your normal warm up until it eventually becomes habit. Once you try it, you will never go back.
Read More :Pool Team Name